Submitting your app to the App Store is a multistep process involving several tools. First, create a distribution provisioning profile using iOS Provisioning Portal. Then create an archive, validate it, and submit it to the App Store using Xcode. When your app is approved, set the date the app will be available to customers using iTunes Connect. Finally, don’t forget to respond to user issues after you ship your first version.
Before You Begin
Before starting, you should have a distribution certificate and the status of your iTunes Connect app record should be “Waiting for Upload” or later, as described in “Creating Your App Record in iTunes Connect.”Now, create a distribution provisioning profile using the iOS Provisioning Portal.
Create a Distribution Provisioning Profile
To create a distribution provisioning profile . . .
- Log in to the iOS Provisioning Portal from the Member Center.
- Select Provisioning in the sidebar.
- Select the Distribution tab.
- Click New Profile.
- Select App Store as the distribution method.
.png)
- Enter a profile name.
- Confirm that your distribution certificate is displayed.
- Choose app ID.
- Click Submit.
When the status of the ad hoc provisioning profile changes from Pending to Active, you can begin using it. You may need to refresh the webpage in the iOS Provisioning Portal to see the status change. If you are using Safari, select View > Reload Page.
.png)
Configuring Your Project for App Store Submission
To submit your app for publication on the App Store, you need to build the app using your team’s distribution code signing identity.To configure your project to facilitate the building of distribution-identity–signed archives of your app:

- In your project, duplicate the Release build configuration and name the duplicate “AppStore”.
- Set the Code Signing Identity build setting to your team’s distribution code signing identity through the app’s distribution provisioning profile for the AppStore build configuration.
- In the target, delete the Validate Build Product build setting specification for the Release build configuration.
- Goto manage schemes and duplicate the scheme that builds your app and name the duplicate “<App_Name>-AppStore”.
- In the AppStore scheme, set the build configuration for the Archive action to AppStore.
Create and Validate the Archive
- Select the Xcode project window.
- Choose iOS Device from the scheme toolbar menu.
- Choose Product > Archive.The Archives organizer appears and displays the new archive.
To validate the archive . . .

- In the Archives organizer, select the archive.
- Click the Validate button.
- Enter your iTunes Connect credentials and click Next.
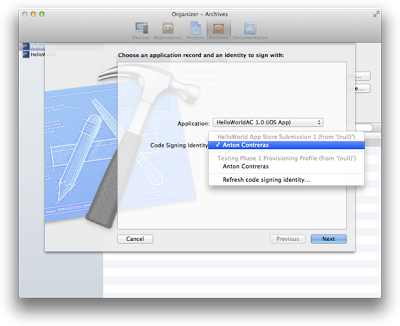
- Select the app you want to share and the appropriate signing identity, and click Next.
- Review validation issues found, if any, and click Finish.
You need to fix any validation issues, create a new archive, and validate it again. You cannot proceed until the archive passes the validation tests.
Submit the Archive
Only after passing validation tests, can you submit your app to the App Store. In fact, Xcode validates your archive again during the submission process.
To submit the archive to the App Store . . .

- In the Archives organizer, select the archive.
- Click the Distribute button.
- Select “Submit to the iOS App Store” and click Next.
- Enter your iTunes Connect credentials and click Next.
- Select the app you want to share and the appropriate signing identity, and click Next.Xcode runs the validation tests again. If issues are found, click Cancel and fix them before continuing.
- Enter a filename and location for the App Store package and click Save.

Xcode transmits the archive to Apple, where it is examined to determine whether it conforms to the app guidelines. If the app is rejected, correct the problems that were brought up during app approval and resubmit it. Before you submit the app, you should read iOS Human Interface Guidelines and App Store Review Guidelines for iOS Apps to avoid problems.
Ship Your App
Use iTunes Connect to set a date when the app is available on the App Store. For example, you can choose a date that immediately releases the app to the App Store after it is approved, or you can set a date for sometime in the future. Using a later availability date allows you to arrange other marketing activities around the launch of your app.
To set the availability date . . .

- Log in to iTunes Connect .
- Select Manage Your Applications.
- Select your app in iOS App Recent Activity.
- Click Rights and Pricing.
- Choose a date from the Availability Date pop-up menus.
- Optionally, edit the other fields on this form.
- Click Save.
Changes you make to Rights and Pricing go live immediately (expect 24 hours for a full refresh of the changes on the App Store).
Comments
Post a Comment